Author: 3iv5aqxcpy9e

  • node-red-scriptable

    node-red-scriptable

    2021 by Ranki s.rankers@einfach-beraten.de

    Permission to use, copy, modify, and/or distribute this software for any purpose with or without fee is hereby granted.

    THE SOFTWARE IS PROVIDED “AS IS” AND THE AUTHOR DISCLAIMS ALL WARRANTIES WITH REGARD TO THIS SOFTWARE INCLUDING ALL IMPLIED WARRANTIES OF MERCHANTABILITY AND FITNESS. IN NO EVENT SHALL THE AUTHOR BE LIABLE FOR ANY SPECIAL, DIRECT, INDIRECT, OR CONSEQUENTIAL DAMAGES OR ANY DAMAGES WHATSOEVER RESULTING FROM LOSS OF USE, DATA OR PROFITS, WHETHER IN AN ACTION OF CONTRACT, NEGLIGENCE OR OTHER TORTIOUS ACTION, ARISING OUT OF OR IN CONNECTION WITH THE USE OR PERFORMANCE OF THIS SOFTWARE.

    DESCRIPTION

    This scriptable shows data from node-red resp. an external JSON-string. See further details (example of JSON-file and node-red integration) at the end of the coding!

    The scriptable can be used in small or medium mode (see examples). The alignment will be automatically done by the script.

    FEATURES

    The script can process several types of data like text, numbers (will be rounded), switches (with different possibilities like SFSymbols) and circles (e.g. to show a level indicator).

    EXAMPLES

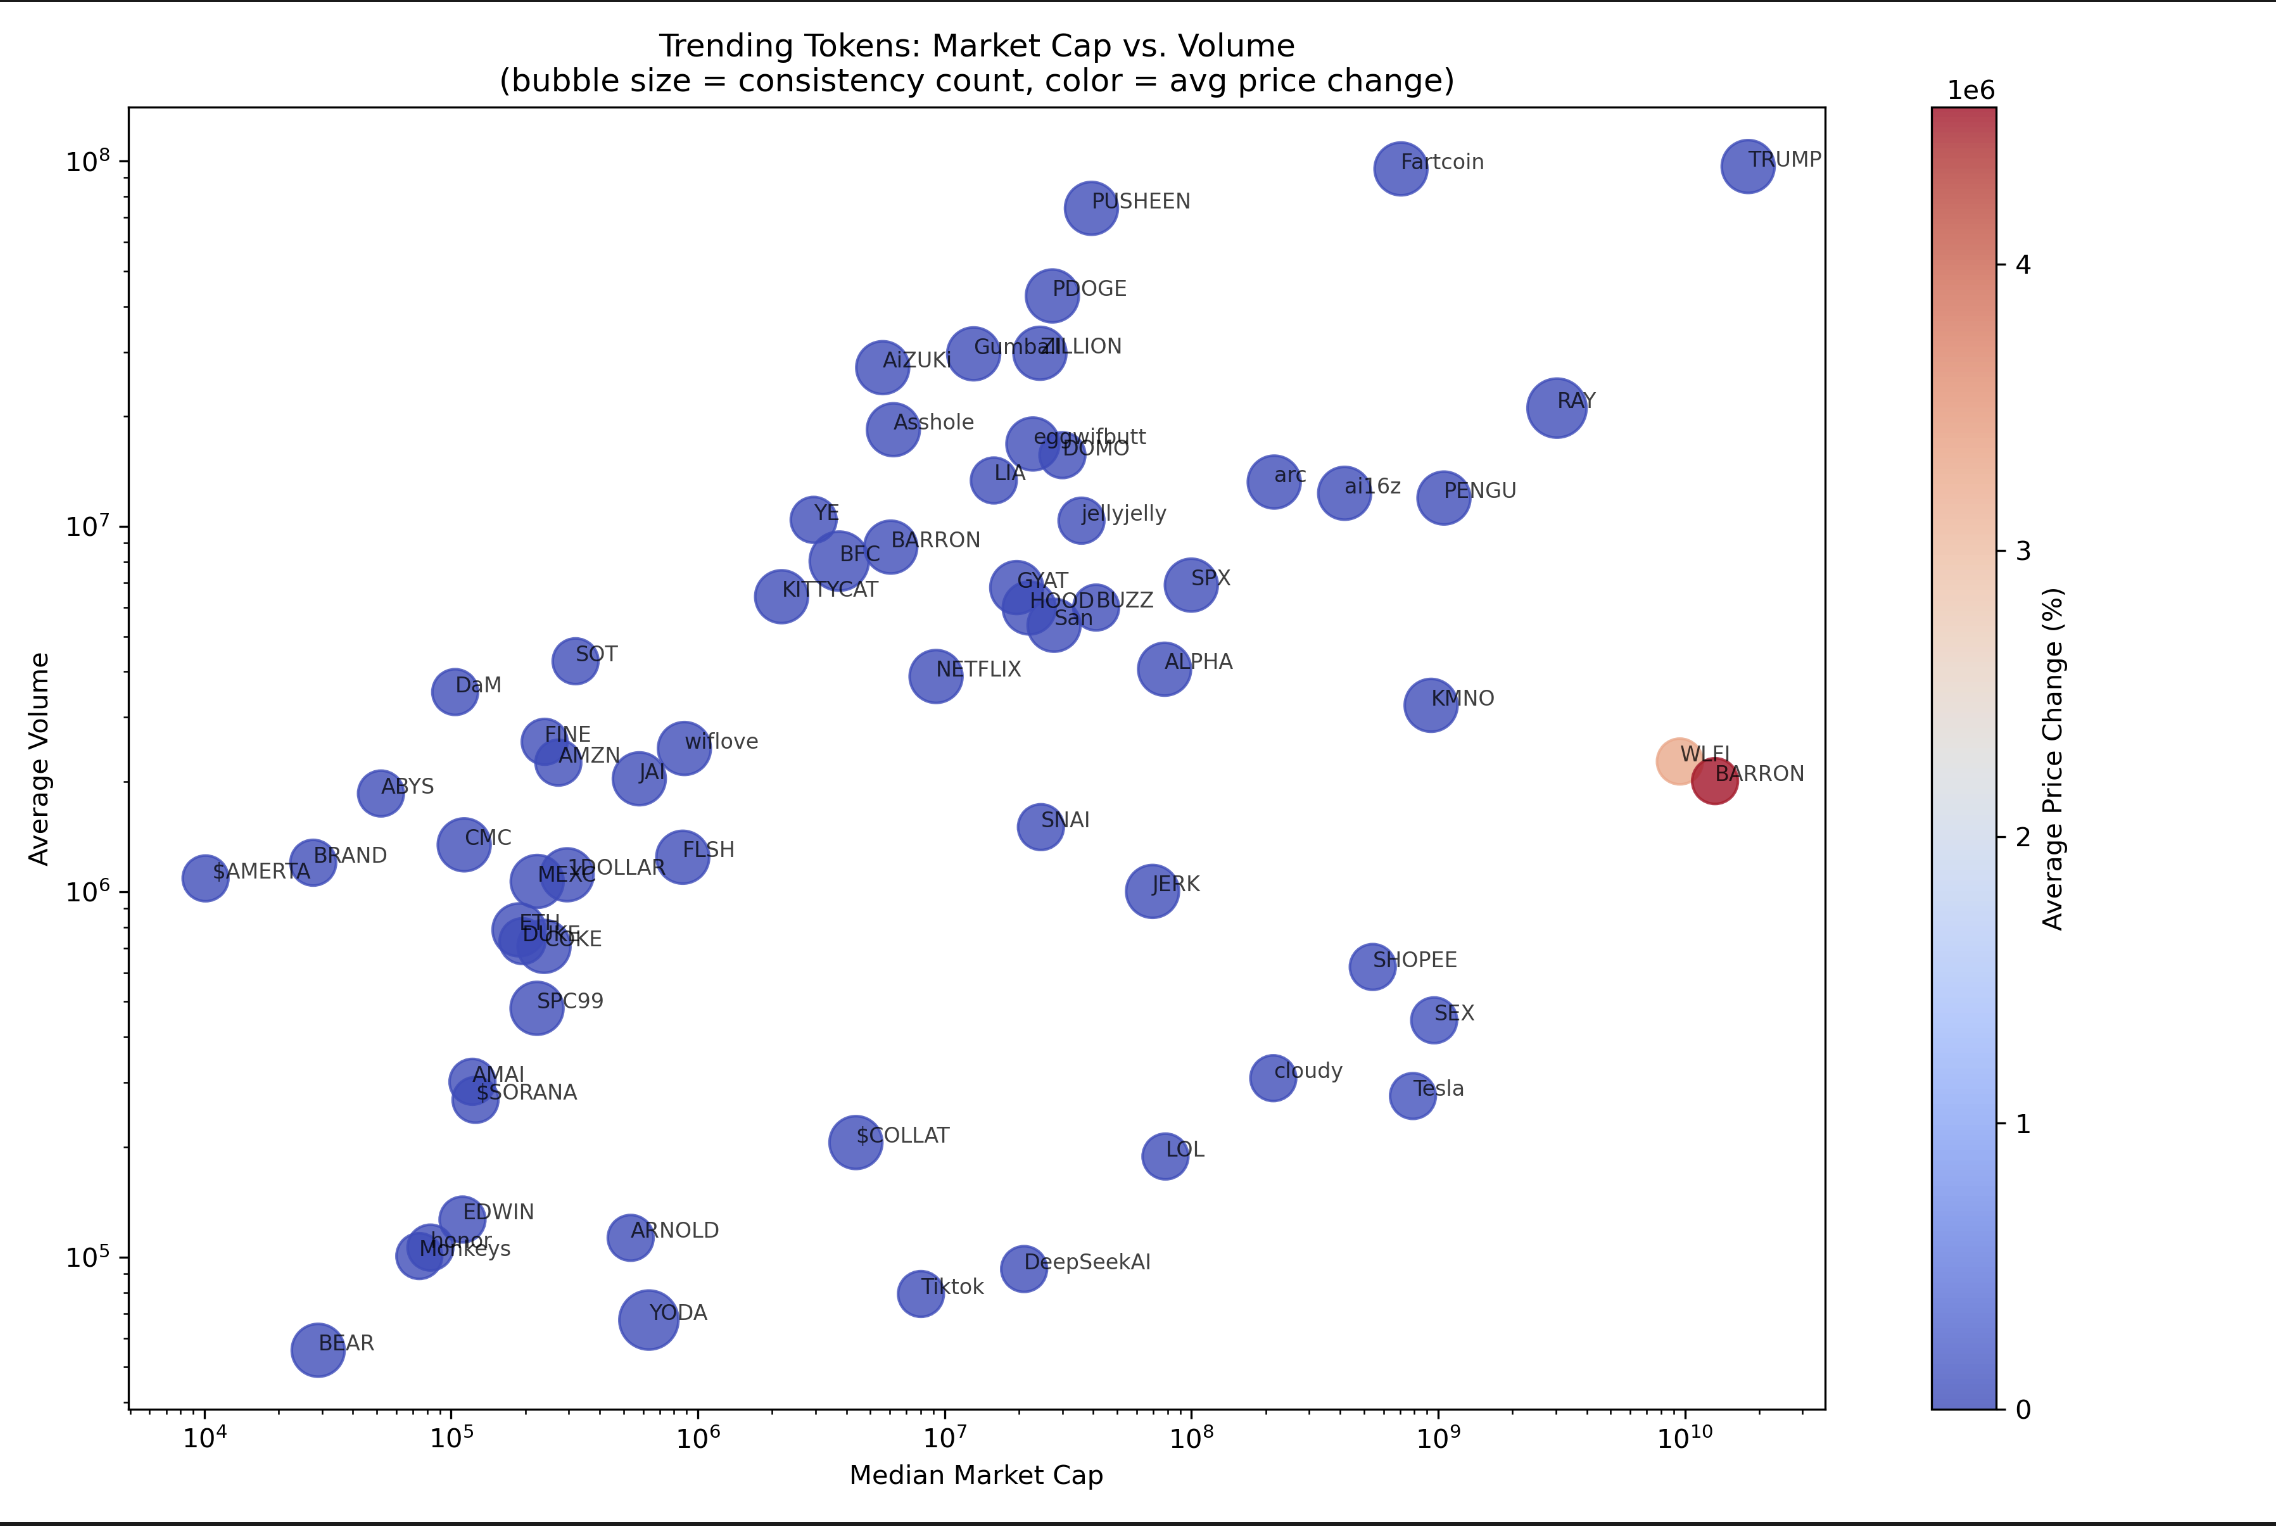
    Medium size widget, «Hello world» example, v1.05
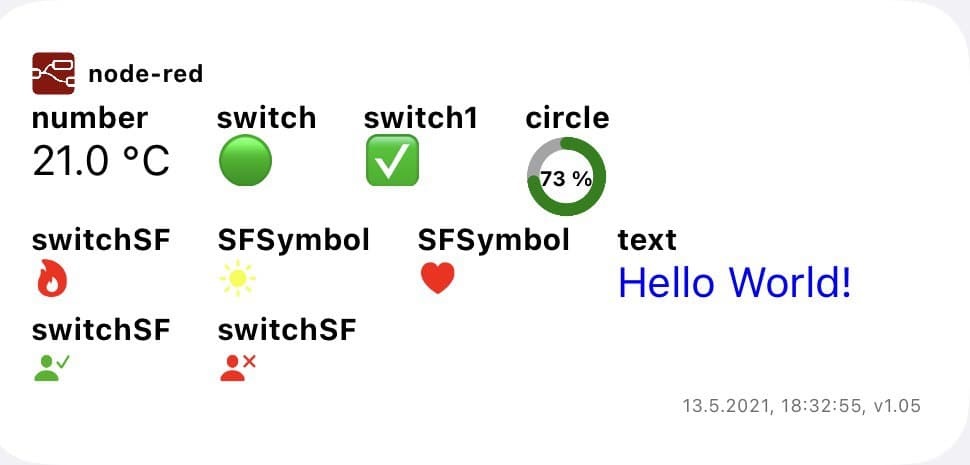
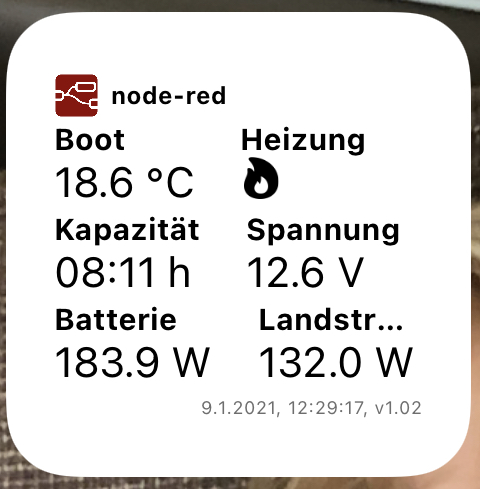
    Medium size Widget, user example: Ranki, v1.03 Small size Widget, user example: Ranki, v1.02
     
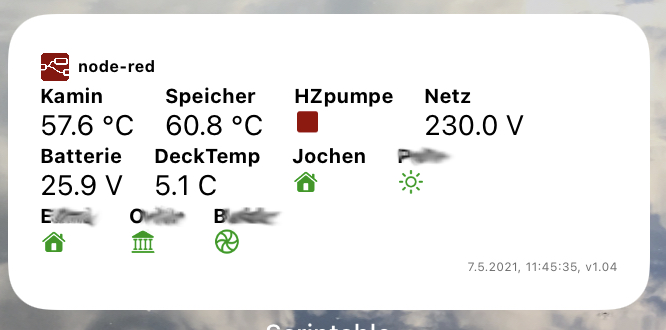
    Medium size Widget, user example: Jochen, v1.04  

    INSTALLATION

    1. Implement the node-red-integration.json part into your node-red installation and adapt the created functions to fill the requested JSON. The current implementation expects the file to be written directly to the node-red instance file system. Alternatively you can also create the file and upload it via FTP to a server of your choice.
    2. Implement the node-red.js into your scriptable app and adapt the variables in the beginning (host, subfolder, filename, opt. authentication etc.)

    Enjoy!

    RELEASE NOTES

    Version 1.06 (23.06.2025)

    • Introduced an update value for the last update of data (filled by source system)
    • Possibility to transfer more Parameters divided by &parametername=parametervalue in Widget-Settings The following parameters can be send/overwritten:
      • host
      • subfolder
      • filename
      • auth_necessary
      • username
      • password
      • bolUseDarkMode
      • forceDarkMode (new with v1.06)
    • Introduce widget-Parameter “forceDarkMode” to force Darkmode for widget independent from Device status

    Version 1.05 (13.05.2021)

    • typos corrected
    • introduced general possibility to transfer color information in data.color
    • changed structure in SFSymbol from data.SFSymbol_Color to data.color (but downside compatible)
    • enabled possibility to determ color of circle filling
    • switch to use dark mode added
    • code resturctured a little bit in order to have all settings at the top
    • optimized node-red example

    Version 1.04 (2021-05-04)

    Version 1.03 (2021-01-10)

    • minimal bugfixing
    • implementation of dataype ‘circle’
    • change default for basic auhentication to ‘false’

    Version 1.02 (2021-01-09)

    • minimal bugfixing
    • manual dark mode does influence widget background color, but does not provide variable dark
    • enhaced error handling: – missing widget in JSON
      • specify function in catch-error and write2error
      • add critical error indicator in order to write errors w/o error msg to the user

    Version 1.01 (2021-01-08)

    • enhanced color support of dark mode
    • seperated header and footer creation
    • separate logging and errors into separate functions
    • enhanced error handling

    Version 1.0 (2021-01-06)

    • initial creation

    BACKLOG/ IDEAS

    • enable differentiated text colors
    • definition of text colors for different ranges of the data value (example: 0-25: green, 26-50: yellow; 51-75: orange, 76 – 100: red)

    EXPECTED JSON-file (Example)

    see file: scriptable.ioswidget

    NODE-RED INTEGRATION (Example)

    see file: node-red-integration.json

    Visit original content creator repository https://github.com/rankerson/node-red-scriptable
  • gmgn-TrendingAnalyzer

    🚀 GMGN Trending Token Analyzer


    Screenshot 2025-02-03 at 19 11 42

    A sophisticated tool for analyzing trending cryptocurrency tokens across multiple timeframes using the GMGN.ai wrapper. The analyzer aggregates data, filters tokens based on key metrics, and provides visual analytics along with expert analysis.

    Screenshot 2025-02-03 at 19 19 18

    🔥 Features

    • 📊 Multi-timeframe token trend analysis (1m, 5m, 1h, 6h, 24h)
    • 📈 Data aggregation and filtering based on volume, market cap, and consistency
    • 🎨 Automated visualization generation
    • Continuous monitoring with automated refresh

    📌 Technical Analysis Components

    🏷️ Token Analysis Logic

    • Fetches trending tokens across multiple timeframes
    • Collects key metrics:
      • 🆔 Token ID, 🔗 Chain, 🏠 Address
      • 🔤 Symbol, 💰 Price, 📊 Volume
      • 🌎 Market Cap, 📉 Price Change Percentage
    • 🚨 Error handling for API requests
    • 🔍 Validation of token data integrity

    📊 Aggregation Logic

    • Groups tokens by address
    • Calculates key aggregated metrics:
      • 📈 Average price and volume
      • 📏 Median market cap
      • 🔀 Price change trends
      • 🔁 Consistency count (appearance across timeframes)
    • Filtering criteria:
      • ✅ Minimum volume threshold: 1000
      • ✅ Minimum market cap threshold: 10000
      • ✅ Minimum consistency count: 3 timeframes

    📉 Visualization Logic

    • Generates scatter plot visualization:
      • 📍 X-axis: Median Market Cap (log scale)
      • 📍 Y-axis: Average Volume (log scale)
      • 🎈 Bubble size: Consistency count
      • 🎨 Color gradient: Average price change
    • 🔤 Includes token symbol annotations
    • 🖼️ Saves high-resolution plot (300 DPI)

    🛠 Installation

    1️⃣ Clone the repository:

    git clone https://github.com/yllvar/gmgn-TrendingAnalyzer.git
    cd gmgn-TrendingAnalyzer

    2️⃣ Create and activate a virtual environment (optional but recommended):

    python -m venv venv
    source venv/bin/activate  # On Windows: venv\Scripts\activate

    3️⃣ Install dependencies:

    pip install -r requirements.txt

    🚀 Usage

    Run the analyzer:

    python analyzer.py

    The script will:

    • 📡 Fetch trending tokens every 60 seconds
    • 🧠 Generate analysis and visualizations
    • 🖼️ Save plots as ‘trending_analysis_plot.png’
    • 📑 Save analysis as ‘trending_analysis.csv’
    • 🖥️ Display token data and analysis in the console

    To stop the script, press Ctrl+C.

    📤 Output

    The analyzer produces:

    • 📑 Tabulated token data with key metrics
    • 🔗 List of token addresses for easy reference
    • 📊 Visual plot saved as 'trending_analysis_plot.png'

    📦 Dependencies

    • 🐍 pandas – Data manipulation and analysis
    • 📊 matplotlib – Data visualization
    • 📜 tabulate – Console table formatting
    • 🔑 python-dotenv – Environment variable management

    ⚠️ Notes

    💡 Acknowledgments

    This project is based on the work of 1f1n and his repository: gmgnai-wrapper.

    Big shoutout to 1f1n for his amazing work! 🙌

    🤝 Contributing

    Feel free to fork this repository, make improvements, and submit a pull request. Contributions are always welcome!

    📜 License

    This project is open-source and free to use. Modify it as you see fit!


    Visit original content creator repository https://github.com/yllvar/gmgn-TrendingAnalyzer
  • build-julia

    build-julia

    An action to build Julia from source for a given commit.

    Usage

    See action.yml.

    name: Example
    
    on: [push, pull_request, workflow_dispatch]
    
    jobs:
      example:
        runs-on: ubuntu-20.04
        strategy:
          matrix:
            # Even if you are only running one build, you may want to use a strategy matrix,
            # as it allows you to refer to the ref using ${{ matrix.julia-ref }} in your workflow.
            # This makes it easier to edit the version that you want to build without having to update
            # several steps.
            julia-ref: [v1.5.3]
    
        steps:
          - name: Cache
            id: cache-julia
            uses: actions/cache@v2
            with:
              # If you use a different target dir, you may want to update the cache key to include that info.
              # actions/cache does not provide an option to specify the target dir for restoring the cache,
              # so you may run into issues where the target dir of the build-julia action mismatches the cached directory.
              path: ~/julia
    
              # Note that this cache key will not work with branches
              # because there could be new commits after the cache has been created.
              key: ${{ runner.os }}-${{ matrix.julia-ref }}
    
          - name: Build Julia
            # Only rebuild Julia if there is no cache hit.
            if: steps.cache-julia.outputs.cache-hit != 'true'
            uses: julia-actions/build-julia@v1
            with:
              # The value that is passed to git checkout, e.g. a tag, branch or a commit.
              #
              # Default: master
              ref: ${{ matrix.julia-ref }}
    
              # The value that is passed to git clone. If you want to build Julia from a fork of yours,
              # you can change this value to https://github.com/YOUR_GITHUB_NAME/julia.git.
              #
              # Default: https://github.com/JuliaLang/julia.git
              source-repo: ''
    
              # The directory that Julia will be installed in. Changing this may be useful when building several
              # versions of Julia within the same environment.
              #
              # Default: $HOME/julia
              target-dir: ''

    Visit original content creator repository
    https://github.com/julia-actions/build-julia

  • vscode-workspaces

    VSCode Workspaces Extension

    GitHub License

    GNOME Extensions download

    Description

    VSCode Workspaces is a project that provides a GNOME Shell extension for accessing visual studio code/codium recently opened workspaces/directories.

    With workspace support, you can open a workspace in Visual Studio Code with a single click.

    Features

    • Supports GNOME Shell 45+
    • List all your local VSCode workspaces
    • List all your remote VSCode projects
    • Add a custom workspace by path
    • Supports both Visual Studio Code and Codium
    • Optional Nautilus extensions for opening folders and files in Visual Studio Code

    Install Extension

    Install from GNOME Extensions

    Install from Source

    bash <(wget -qO- https://raw.githubusercontent.com/ZanzyTHEbar/vscode-workspaces/main/install.sh)

    Usage

    GNOME Shell Extension

    To open a recent folder or workspace, click on the Visual Studio Code icon in the top bar and select a recent folder or workspace.

    You also have various options to configure the extension in the GNOME Tweaks application.

    Integrates well with the VSCode Search Provider.

    Uninstall GNOME Shell Extension

    To uninstall a GNOME Shell extension, you can use the GNOME Tweaks application or the gnome-extensions command.

    gnome-extensions disable vscode-workspaces@prometheontechnologies.com
    gnome-extensions uninstall vscode-workspaces@prometheontechnologies.com

    You can also remove the directory manually.

    rm -rf ~/.local/share/gnome-shell/extensions/vscode-workspaces@prometheontechnologies.com

    Nautilus Extensions

    Provided are two other, optional, extensions for Nautilus.

    The first, vscode_nautilus_workspaces.py, adds a right-click context menu to select from a list of recently accessed workspaces or directories and open in Visual Studio Code.

    The second, vscode_nautilus_open.py, adds a right-click context menu to open a folder or file in Visual Studio Code.

    To open a folder or file in Visual Studio Code, right-click on an item in Nautilus and select the “Open in Code” option.

    To open a recent folder or workspace, right-click on an empty space in Nautilus and select the “Open Recent Workspaces” option.

    Uninstall Nautilus Extensions

    rm -f ~/.local/share/nautilus-python/extensions/vscode_nautilus_workspaces.py
    rm -f ~/.local/share/nautilus-python/extensions/vscode_nautilus_open.py

    Development

    The latest development version requires git, node, and make.

    I use pnpm, but you can use npm or yarn if you prefer. It is up to you to modify the scripts to use your preferred package manager.

    Navigate to your desired directory and execute following commands in the terminal:

    GNOME 45+

    git clone https://github.com/ZanzyTHEbar/vscode-workspaces.git
    cd vscode-workspaces/gnome-extension
    
    make && make install

    You can run make help to see all available commands.

    Enabling the extension

    After installation you need to enable the extension.

    • First restart GNOME Shell (ALt + F2, r, Enter, or Log-Out/Log-In if you use Wayland)
    • Now you should see the VSCode W extension in the Extensions application (reopen the app if needed to load new data), where you can enable it.

    Debugging

    The GNOME Extension has a debug mode that is enabled by default. You can disable it by opening the settings of the extension in the GNOME Extensions application.

    I personally use Extensions List, a GNOME Shell extension.

    If you would like to see logs for this extension: journalctl /usr/bin/gnome-shell -f | grep vscode-workspaces.

    Or simply run journalctl /usr/bin/gnome-shell -f and look for the logs.

    Contributing

    If you’d like to contribute, please fork the repository and use a feature branch. Pull requests are warmly welcome 😄

    Visit original content creator repository https://github.com/ZanzyTHEbar/vscode-workspaces
  • Noti (Telegram Bot)

    Noti (Telegram Bot)

    Noti (Telegram Bot) repository has Ukrainian 🇺🇦 and English 🇬🇧 localizations

    Quick Navigation

    Noti 🇺🇦

    Обкладинка бота

    Про проект

    Noti – це зручний і функціональний Telegram бот, створений для полегшення вашого повсякденного життя. З його допомогою ви зможете легко планувати різні завдання, події та нагадування, щоб нічого не пропустити та завжди залишатися організованим. Його основна задача нагадувати вам про повсякденні дії, які потрібно робити з певною періодичністю.

    Використання

    Noti має зручний та інтуїтивно зрозумілий інтерфейс. Ось основні команди для роботи з ботом:

    • /start – запустити бота та отримати вітальне повідомлення
    • /help – отримати інформацію про функції бота
    • /info – дізнатися кількість днів до найближчого нагадування
    • /add_notification – додати нове нагадування
    • /edit_notification – редагувати нагадування, що вже існує
    • /remove_notification – видалити нагадування
    • /remove_user – видалити всю особисту інформацію

    Використані технології

    Noti розроблено з використанням наступних технологій:

    • Мова програмування: Python 3.11.8
    • Бібліотека для роботи з Telegram API: telebot 0.0.5
    • Стандартні бібліотеки Python: json, datetime, calendar, time
    • Сторонні бібліотеки: schedule 1.2.1

    Посилання

    Username бота: @notification_noti_bot

    Посилання на бота: https://t.me/notification_noti_bot


    Noti 🇬🇧

    The bot's cover

    About

    Noti is a convenient and functional Telegram bot designed to make your daily life easier. With its help, you can easily schedule various tasks, events, and reminders so that you don’t miss anything and always stay organized. Its main task is to remind you of everyday activities that need to be done at a certain frequency.

    Usage

    Noti has a user-friendly and intuitive interface. Here are the main commands for working with the bot:

    • /start – start the bot and get a welcome message
    • /help– get information about the bot’s functions
    • /info – find out the number of days until the next reminder
    • /add_notification – add a new reminder
    • /edit_notification – edit an existing reminder
    • /remove_notification – delete a reminder
    • /remove_user – delete all personal information

    Technologies Used

    Noti is developed using the following technologies:

    • Programming language: Python 3.11.8
    • Library for working with Telegram API: telebot 0.0.5
    • Standard Python libraries: json, datetime, calendar, time
    • Standard libraries: schedule 1.2.1

    Links

    Bot username: @notification_noti_bot

    Bot link: https://t.me/notification_noti_bot

    Visit original content creator repository https://github.com/NikitaBerezhnyj/Noti