Category: Blog

  • ts-express-react

    ts-express-react

    An easy and straight forward full-stack web application boilerplate using Node.js Express as backend and React as frontend.
    All packages are structured as Yarn Workspaces and written in Typescript.
    In addition, the web application can be built as Docker image using a multi stage built supported Dockerfile.

    Introduction

    This boilerplate uses yarn workspaces which allows both client and server workspaces to use common workspace for type definitions or any other information relevant.

    Prerequisite

    make sure yarn is installed.

    npm i -g yarn
    

    Common

    A workspace that includes common logic to be imported from other relevant workspaces.

    Server

    A workspace that includes a Node.js Express web application.

    Client

    A workspace that includes a React single page application.

    Quick Start

    # Clone repository
    git clone https://github.com/rok-tel/ts-express-react <Your_App_Name>
    
    # Enter project root directory
    cd <Your_App_Name>
    
    # Install dependencies
    yarn
    
    # Running dev mode
    yarn dev
    
    # Build for production
    yarn common build
    yarn client build
    yarn server build
    
    # Running prod mode
    yarn start

    Development mode

    Running yarn dev runs both client and server concurrently with live reloading mode.
    Which allows direct impact of changed code without build process.

    1. Server -> ts-node-dev --transpile-only src/index.ts
    2. Client -> react-scripts start

    This enables running client react app at http://localhost:3000 with proxy to running server app at http://localhost:8080

    • See link for more information.

    Production mode

    Running yarn server start runs the web application with transpiled code of its workspaces.

    • Remember running build commands beforehand. (See Quick Start).

    Docker container mode

    • Notice – If Docker is not installed on your machine, you can download it from here.

    # Enter project root directory
    cd <Your_App_Name>
    
    # Build docker container image
    # Notice - replace <Image_Name>, <Image_Tag> 
    # with your chosen image name and tag
    docker build . -t <Image_Name>:<Image_Tag>
    
    # Run a docker image
    # Notice - replace <Port> with desired port
    # in host machine
    docker run -p <Port>:8080 <Image_Name>:<Image_Tag>

    Documentation

    Directory Structure

    All workspaces are under packages directory.

    Each workspace –

    1. contains src directory for Typescript code.
    2. contains tsconfig.json file for Typescript options and configuration.
    3. Would be built and transpiled to build directory.

    Typescript

    TypeScript is a programming language developed and maintained by Microsoft. It is a strict syntactical superset of JavaScript and adds optional static typing to the language.

    Node js

    Node.js is an open-source, cross-platform, back-end JavaScript runtime environment that runs on the V8 engine and executes JavaScript code outside a web browser.

    Express

    Express is a backend web application framework for Node.js, It is designed for building web applications and APIs. It has been called the de facto standard server framework for Node.js.

    React

    React is a free and open-source front-end JavaScript library for building user interfaces or UI components.

    Yarn

    Yarn is a package manager that replaces the existing workflow for the npm client or other package managers while remaining compatible with the npm registry. It has the same feature set as existing workflows while operating faster, more securely, and more reliably.

    Yarn Workspaces

    Yarn Workspaces are a new way to set up your package architecture that’s available by default starting from Yarn 1.0. It allows you to setup multiple packages in such a way that you only need to run yarn install once to install all of them in a single pass.

    Docker

    Docker is a set of platform as a service products that use OS-level virtualization to deliver software in packages called containers.

    Visit original content creator repository
    https://github.com/rok-tel/ts-express-react

  • glpi2mdt

    Visit original content creator repository
    https://github.com/RandomFrenchAdmin/glpi2mdt

  • installSwapfile

    installSwapfile

    Note: While you can still use this method to add a swap file, note that newer versions of L4T/JetPack have swap memory as part of the default distribution, implemented through zram. You may choose to use both a swapfile, as implemented here, and the zram swap memory at the same time.

    Original article on JetsonHacks: https://wp.me/p7ZgI9-1ac

    Install a swap file on the NVIDIA Jetson Nano Developer Kit. This should help with memory pressure issues.

    Setup Swap File

    installSwapFile.sh – Create a swap file ; Use on external media like USB drive or SSD

    usage: installSwapFile.sh [[[-d directory ] [-s size] -a] | [-h]]

    -d | –dir [directoryname] Directory to place swapfile (defaults to /mnt)

    -s | –size [gigabytes] (defaults to 6 )

    -a | –auto Enable swap on boot in /etc/fstab (default: “Y”)

    -h | –help This message

    Defaults to creating a 6GB Swapfile in the current directory

    Note: If you enable swap on boot, you should also automount the drive that you’re using

    Automount

    Automount a device given the label

    autoMount.sh – Automount a device, useful for external media like USB drives

    usage: autoMount.sh [ [-l label] | [-h]]

    -l | –label [labelname] Label to lookup

    -h | –help This message

    Example usage:

    $ ./shellScript.sh -l RaceUSB

    where RaceUSB is the label of the device mounted at /media/jetsonhacks/RaceUSB

    Tool to help automount the device given from the label
    The script looks up the device, mounting point and UUID for the given label
    Optionally add it to /etc/fstab

    Release Notes

    v0.7 April 2019

    • Add Automount Support
    • L4T 32.1.0 (JetPack 4.2)
    • Tested on Jetson Nano

    Initial Release April, 2019

    • L4T 32.1.0 (JetPack 4.2)
    • Tested on Jetson Nano

    Visit original content creator repository
    https://github.com/JetsonHacksNano/installSwapfile

  • NumericalMethodsInStatisticalPhysics

    Projects for the lecture Numerical Methods of Statistical Physics

    The lecture was held by Markus Quandt and Giuseppe Burgio in summer term 2020 at University of Tübingen.

    The used language for simulations is C++20. The IDE is CLion. The used build-system is Debian Buster. It should also work on other platforms with small modifications in CMakeLists.txt.

    Testing different random-number-generators (RNGs)

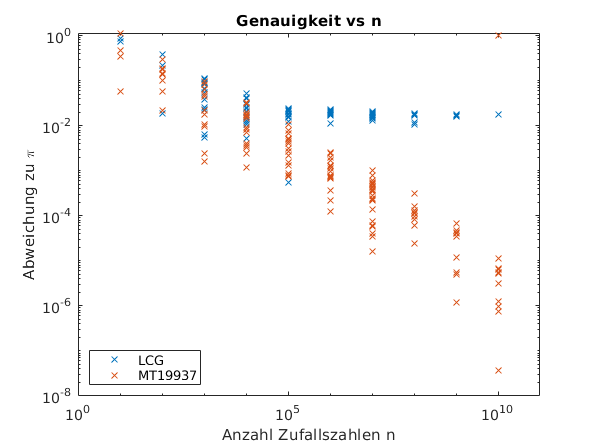
    Diagram of Convergence

    I did a pi-Test with 2 different random number generators (RNGs). The program can run in a fully parallelized mode.

    The RNGs were used from standard C++ header Random.h.

    We can see the convergence of the Mersenne-Twister MT19937 algorithm with up to 1E10 random numbers per calculated point. Convergence doesn’t seem to slow down until 1E10, so I assume we can calculate pi more exactly with more time. The maximum period of random numbers of MT19937 is pow(2,19937)-1, so this would be a thinkable limit.

    The linear congruential RNG (LCG) is limited in randomness and periodicity which results in limited convergence. With this RNG it is not possible to determine pi more exactly than up to 1E-2.

    Forest Fire Simulations

    There are some interesting Simulations of Forest-Fire-Cellular-Automatons:

    https://people.sc.fsu.edu/~jburkardt/c_src/forest_fire_simulation/forest_fire_simulation.html

    https://perso.u-cergy.fr/~ahonecker/bs/software/forest2d.html

    Sand Piles

    This project is available under: https://github.com/Babalion/sandpiles

    Calculate spectral dimensions of fractal structures

    This project is available under: https://github.com/Babalion/Fractal-Dimensions

    Solve the travelling-salesman-problem (tsp) with a simulated annealing algorithm

    This project is available under: https://github.com/Babalion/simulated-annealing-tsp

    Ising Model

    2 Level System

    This project is available under: https://github.com/Babalion/Ising2level

    Sigma-Model

    This is an Ising-Spin-System on a square lattice where every spin can direct in an arbitrary angle in 2D. One can thus parametrize each spin via angle theta. You can also view the simulation live via openCV. Example below:

    ….

    Visit original content creator repository https://github.com/Babalion/NumericalMethodsInStatisticalPhysics
  • bball

    Plan My Lineup

    A simple tool to help coaches plan their youth basketball lineups.

    Overview

    Coaching is a fun and rewarding experience, especially when working with youth basketball teams. However, planning a lineup can sometimes be a little stressful. Most leagues require equal playing time for all players. If you have a team of 10 players, rotating between players is pretty straightforward; just swap 5 players each quarter (or half quarter).

    However, if you have an odd number of players (or players missing from a game), it can be harder to plan. I developed this tool to make it easier to set lineups and preview what each quarter or period will look like.

    How It Works

    This tool takes a simple approach to generating a basketball lineup. Given a list of players, it will take increments of 5 players and add them to a quarter or period (half a quarter). Once the end of the list of players is reached, it will start from the top until 5 players are chosen.

    Features

    • Add and remove a list of players
    • Toggle if a player is active
    • Drag and drop players to fine tune lineups
    • Randomize the order of players
    • Formatting for easy printing

    Try It Out

    https://redonkulus.github.io/bball/

    Visit original content creator repository
    https://github.com/redonkulus/bball

  • eMixedNiteMC-Language-Pack

    Note: eMixedNiteMC Language Pack is no longer needed after eMixedNiteMC v3.5!

    eMixedNiteMC Language Pack Release Download Crowdin

    Provide the functionality to localize eMixedNiteMC v2.75+ in any language Playnite support. This extension is Needed to run eMixedNiteMC properly!

    Latest Update

    Link: eMixedNiteMC Language Pack 1.7

    Alt Text

    Changelog

    • Version: 1.7

      • Updated localization
        • Change both french localization “fois” to “sessions” and “session”
        • Portuguese, Brazilian 20% (Done by Lucoshi)
    • Version: 1.6

      • Updated localization
        • Added “LOCGameViewLastPlayedNotPlayed”
        • Added “LOCGameViewPlayCountNotPlayed”
        • Added “LOCGameViewPlayCountTimes”
        • Added “LOCGameViewPlayCountTime”
        • Spanish Updated (Done by BanCrash)
    • Version: 1.5

      • Updated localization
        • Arabic Updated (Done by X4lo)
        • Spanish Updated (Done by BanCrash)
    • Version: 1.4

      • Updated localization
        • Added “LOCGameViewPlayCountVisibility”
    • Version: 1.3

      • Updated localization
        • Correction of 4 translations in Spanish (Done by BanCrash)
        • Norwegian 5% (Done by MeatBoy)
        • Arabic 100% (Done by X4Lo)
    • Version: 1.2

      • Updated localization
        • Arabic ~80% (Done by X4Lo)
        • Spanish 100% (Done by BanCrash)
    • Version: 1.1

      • Updated localization
        • Localization files cleanup
        • Spanish done at ~50% (done by BanCrash)
    • Version: 1.0

      • First Release
      • Needed for the theme eMixedNiteMC to work properly
      • Add Localization to eMixedNiteMC v2.75+
        • Localized with Crowdin
        • You can help translate here
        • Only 100% localized in these language at the moment
          • English US
          • French FR

    Link: Forum

    You can help translate this extension on Crowdin

    Visit original content creator repository https://github.com/MCC321-QC/eMixedNiteMC-Language-Pack
  • California-House-Model

    🏡 California House Price Prediction

    Build Status Python Version Contributors License

    📌 Overview

    The California House Price Prediction project leverages machine learning to forecast house prices based on various factors such as location, median income, and average rooms per household. By building a comprehensive data pipeline, we aim to predict house prices with high accuracy and provide actionable insights.


    ✨ Key Features

    • 🔍 Data Preprocessing & Cleaning: Handle missing values, detect outliers, and normalize data for optimal model performance.
    • 📊 Exploratory Data Analysis (EDA): Visualize correlations and trends to extract meaningful insights.
    • 🛠 Machine Learning Pipeline: Automated feature engineering, model selection, and hyperparameter tuning.
    • 📈 Support for Multiple Regression Models: Compare different models to achieve the best prediction accuracy.

    📂 Project Structure

    california-house-price-prediction/
    │
    ├── data/                                 # Dataset files (raw and processed)
    ├── Notebooks/                            # Jupyter notebooks for analysis and experiments
    │   ├──California_house_model (1).ipynb   # Jupyter Notebook Code      
    ├── src/                                  # Source code for data processing and model training
    │   ├──california_house_model.py          # Python Code
    ├── requirements.txt                      # Python dependencies
    ├── .gitignore                            # Ignored files and directories
    └── README.md                             # Project documentation

    🚀 Installation & Setup

    1. Clone the Repository:
      git clone https://github.com/Fujelhrx/California-House-Model.git
      cd california-house-price-prediction
    2. Install Dependencies:
      pip install -r requirements.txt
    3. Run the Jupyter Notebook:
      jupyter notebook

    🛠 Usage

    • Open California_house_model.ipynb and run all cells to preprocess the data, train the model, and evaluate predictions.
    • For command-line usage, execute the training script:
      python src/california_house_model.py

    Custom Transformers Example

    The script demonstrates how to build custom transformers using BaseEstimator and TransformerMixin, such as:

    • StandardScalerClone: A custom standard scaler.
    • ClusterSimilarity: Computes RBF kernel similarity to cluster centers.

    Future Improvements

    • Add machine learning model training and evaluation.
    • Optimize the feature engineering process.
    • Implement hyperparameter tuning for better prediction accuracy.

    🤝 Contributing

    We welcome contributions from the community! Here’s how you can help:

    1. Fork the repository.
    2. Create a new branch for your feature or bugfix.
    3. Submit a pull request with a detailed explanation.

    📜 License

    This project is licensed under the MIT License. See the LICENSE file for details.


    🌟 Acknowledgments

    • scikit-learn: For providing the essential machine learning tools.
    • California Housing Dataset: The backbone of our data.
    • Open-source Contributors: For their continuous support and contributions.

    📬 Contact Us

    We’d love to hear from you! If you have any questions, feedback or suggestions, feel free to reach out:


    💡 FAQ

    Q: What dataset is used?
    A: The dataset is a publicly available California housing dataset that includes features such as median income, location, and the number of rooms.

    Q: Can I adapt this project for another region?
    A: Absolutely! Modify the preprocessing and data handling steps to fit your custom dataset.


    Visit original content creator repository https://github.com/Fujelhrx/California-House-Model
  • SegmentedControl-Demo-Qt-Python

    SegmentedControl-Demo-Qt-Python

    PyQt hasn’t included a “stock” segmented control (set of mutually-exclusive, visually abbutting buttons), so I wrote one in Python.

    Usage:

    #Disabled, Two Buttons:
    sc0 = SegmentedControl()
    sc0.AppendSegmentButton("No")
    sc0.AppendSegmentButton("Yes")
    sc0.setEnabled(False)
    
    #Enabled, Three Buttons:
    sc1 = SegmentedControl()
    sc1.AppendSegmentButton("No")
    sc1.AppendSegmentButton("Maybe")
    sc1.AppendSegmentButton("Yes")
    
    #Enabled, NOT Mutually Exclusive:
    sc2 = SegmentedControl(False)
    sc2.AppendSegmentButton("No")
    sc2.AppendSegmentButton("Maybe")
    sc2.AppendSegmentButton("Yes")
    
    #Text with Icon:
    sc3 = SegmentedControl()
    sc3.AppendSegmentButton("No", "./../Images/img20x20.png", QtCore.QSize(12, 12))
    sc3.AppendSegmentButton("Maybe", "./../Images/img20x20.png", QtCore.QSize(12, 12))
    sc3.AppendSegmentButton("Yes", "./../Images/img20x20.png", QtCore.QSize(12, 12))
    
    #Icon Only:
    sc4 = SegmentedControl()
    sc4.AppendSegmentButton("", "./../Images/img20x20.png", QtCore.QSize(14, 14))
    sc4.AppendSegmentButton("", "./../Images/img20x20.png", QtCore.QSize(14, 14))
    sc4.AppendSegmentButton("", "./../Images/img20x20.png", QtCore.QSize(14, 14))
    
    #Larger Icon:
    sc5 = SegmentedControl()
    sc5.AppendSegmentButton("", "./../Images/img30x30.png", QtCore.QSize(30, 30))
    sc5.AppendSegmentButton("", "./../Images/img30x30.png", QtCore.QSize(30, 30))
    sc5.AppendSegmentButton("", "./../Images/img30x30.png", QtCore.QSize(30, 30))
    
    #Mixed; Four Buttons, with an Initial Selection:
    sc6 = SegmentedControl()
    sc6.AppendSegmentButton("No")
    sc6.AppendSegmentButton("Yes", "./../Images/img10x10.png", QtCore.QSize(10, 10))
    sc6.AppendSegmentButton("", "./../Images/img20x20.png", QtCore.QSize(20, 20))
    sc6.AppendSegmentButton("", "./../Images/img30x30.png", QtCore.QSize(30, 30))
    sc6.setButtonState(1, True)
    
    #Setting up Button Callbacks
    #Clicked:
    sc0.buttonIdClicked.connect(firstRowClickedButtonId)
    #Pressed:
    sc0.buttonIdPressed.connect(firstRowPressedButtonId)
    #Released:
    sc0.buttonIdReleased.connect(firstRowReleasedButtonId)
    

    Visit original content creator repository
    https://github.com/kleydon/SegmentedControl-Demo-Qt-Python

  • rails_admin_yamap_field

    Gem Version

    RailsAdminYamapField

    Simple implementation of Yandex maps in rails admin.

    Inspired by these projects:

    Installation

    Add this line to your application’s Gemfile:

    gem 'rails_admin_yamap_field'

    And then execute:

    $ bundle

    Usage

    Add attr_accessor ya_map to you model for which you need to show the map or define ya_map and ya_map= methods as you wish, for example:

    class Address < ApplicationRecord
      # others methods
      def ya_map=(lat_lon)
        self[:lat], self[:lon] = lat_lon.split(",")
      end
      def ya_map
        [lat, lon].join(",")
      end
      # others methods
    end

    Available options for configure in rails_admin:

    • center_lat – map center latitude
    • center_long – map center longitude
    • zoom_level – map zoom level
    • map_html_width – width div map container: default ‘100%’
    • map_html_height – height div map container: default ‘500px’
    • map_lang – language map: default ‘ru_RU’, for other values see this ref
    • api_key – api key for enterprise version: default ‘nil’
    • latitude_field – latitude attribute name in you model: default ‘latitude’
    • longitude_field – longitude attribute name in you model: default ‘longitude’

    Example:

    class Address < ApplicationRecord
      attr_accessor :ya_map
    
      rails_admin do
        field :lat, :hidden
        field :lon, :hidden
        field :ya_map, :yamap_field do
          map_html_width "600px"
          latitude_field :lat
          longitude_field :lon
         end
      end
    end

    Screenshot

    Sample screenshot

    References

    Contributing

    Feel free to send pull requests or write issue.

    License

    The gem is available as open source under the terms of the MIT License.

    Visit original content creator repository https://github.com/Yegorov/rails_admin_yamap_field
  • locate_pixelcolor_cythonmulti

    Detects colors in images 5-10 x faster than Numpy

    pip install locate-pixelcolor-cythonmulti

    Tested+compiled against Windows 10 / Python 3.10 / Anaconda

    If you can’t import it, compile it on your system (code at the end of this page)

    How to use it in Python

    import numpy as np
    import cv2
    from locate_pixelcolor_cythonmulti import search_colors
    # 4525 x 6623 x 3 picture https://www.pexels.com/pt-br/foto/foto-da-raposa-sentada-no-chao-2295744/
    picx = r"C:\Users\hansc\Downloads\pexels-alex-andrews-2295744.jpg"
    pic = cv2.imread(picx)
    colors0 = np.array([[255, 255, 255]],dtype=np.uint8)
    resus0 = search_colors(pic=pic, colors=colors0)
    colors1=np.array([(66,  71,  69),(62,  67,  65),(144, 155, 153),(52,  57,  55),(127, 138, 136),(53,  58,  56),(51,  56,  54),(32,  27,  18),(24,  17,   8),],dtype=np.uint8)
    resus1 =  search_colors(pic=pic, colors=colors1)
    ####################################################################
    %timeit resus0=search_colors(pic,colors0)
    32.3 ms ± 279 µs per loop (mean ± std. dev. of 7 runs, 10 loops each)
    
    b,g,r = pic[...,0],pic[...,1],pic[...,2]
    %timeit np.where(((b==255)&(g==255)&(r==255)))
    150 ms ± 209 µs per loop (mean ± std. dev. of 7 runs, 10 loops each)
    ####################################################################
    %timeit resus1=search_colors(pic, colors1)
    151 ms ± 3.21 ms per loop (mean ± std. dev. of 7 runs, 10 loops each)
    
    %timeit np.where(((b==66)&(g==71)&(r==69))|((b==62)&(g==67)&(r==65))|((b==144)&(g==155)&(r==153))|((b==52)&(g==57)&(r==55))|((b==127)&(g==138)&(r==136))|((b==53)&(g==58)&(r==56))|((b==51)&(g==56)&(r==54))|((b==32)&(g==27)&(r==18))|((b==24)&(g==17)&(r==8)))
    1 s ± 16.1 ms per loop (mean ± std. dev. of 7 runs, 1 loop each)
    ####################################################################

    The Cython Code

    # distutils: language = c++
    # cython: language_level=3
    # distutils: extra_compile_args = /openmp
    # distutils: extra_link_args = /openmp
    
    
    from cython.parallel cimport prange
    cimport cython
    import numpy as np
    cimport numpy as np
    import cython
    from collections import defaultdict
    
    @cython.boundscheck(False)
    @cython.wraparound(False)
    @cython.cdivision(True)
    cpdef searchforcolor(unsigned char[:] pic, unsigned char[:] colors, int width, int totallengthpic, int totallengthcolor):
        cdef my_dict = defaultdict(list)
        cdef int i, j
        cdef unsigned char r,g,b
        for i in prange(0, totallengthcolor, 3,nogil=True):
            r = colors[i]
            g = colors[i + 1]
            b = colors[i + 2]
            for j in range(0, totallengthpic, 3):
                if (r == pic[j]) and (g == pic[j+1]) and (b == pic[j+2]):
                    with gil:
                        my_dict[(r,g,b)].append(j )
    
        for key in my_dict.keys():
            my_dict[key] = np.dstack(np.divmod(np.array(my_dict[key]) // 3, width))[0]
        return my_dict

    setup.py to compile the code

    # distutils: language = c++
    # cython: language_level=3
    
    from setuptools import Extension, setup
    from Cython.Build import cythonize
    import numpy as np
    ext_modules = [
        Extension("colorsearchcythonmulti", ["colorsearchcythonmulti.pyx"], include_dirs=[np.get_include()],define_macros=[("NPY_NO_DEPRECATED_API", "NPY_1_7_API_VERSION")])
    ]
    
    setup(
        name='colorsearchcythonmulti',
        ext_modules=cythonize(ext_modules),
    )
    
    
    # .\python.exe .\colorsearchcythonmultisetup.py build_ext --inplace

    Visit original content creator repository
    https://github.com/hansalemaos/locate_pixelcolor_cythonmulti