Blog

  • rt_usb_9axisimu_driver

    日本語 | English

    rt_usb_9axisimu_driver

    industrial_ci

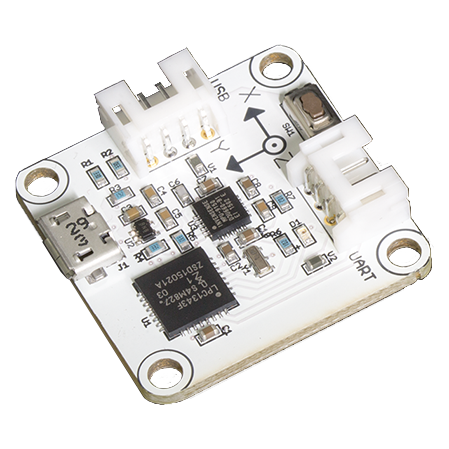
    株式会社アールティが販売しているUSB出力9軸IMUセンサモジュール用のROS 2パッケージです。

    usb-9axisimu

    現在、以下のROSのディストリビューションに対応しております。

    1. 概要

    rt_usb_9axisimu_driverは株式会社アールティが販売している
    USB出力9軸IMUセンサモジュール
    のROS 2パッケージです。

    株式会社アールティによって開発、メンテナンスがなされています。

    1.1 座標軸について

    USB出力9軸IMUセンサモジュールは、センサとしてInvenSense社のMPU9250を使用しております。
    このセンサの磁気センサの座標系はNED座標系(x-north, y-east, z-down)ですが、
    モジュール内のマイコン(LPC1343)においてENU座標系(x-east, y-north, z-up)に変換され、
    ジャイロセンサおよび加速度センサの座標系と揃えられております。
    これはROSで使われる座標系のルールにも適合しています。詳しくは、REP-0103をご覧ください。

    1.2 ファームウェア開発について

    USB出力9軸IMUセンサモジュールはオープンハード・オープンソースのため、モジュール内のマイコンのファームウェアの変更が可能です。
    このROSパッケージはデフォルトのファームウェアにのみ対応しております。ファームウェアを変更された場合、正常な動作ができなくなる恐れがございますので、ご了承ください。

    1.3 ver2.0でのご利用について

    2020年8月現在、販売されているUSB出力9軸IMUセンサモジュールはver2.0となります。
    このバージョンのデフォルトのファームウェアには、ASCII出力とBinary出力の2つのデータ出力形式があります。
    センサ出荷時点ではASCII出力に設定されています。出力形式の切り替え方法は、以下のリポジトリにあるマニュアルをご参照ください。
    https://github.com/rt-net/RT-USB-9AXIS-00

    [ERROR] Error opening sensor device, please re-check your devices. が発生する場合

    ポートの権限を変更してください。

    $ sudo chmod 666 /dev/ttyACM0

    2. インストール

    2.1 バイナリをインストールする場合

    # ROS 2 Humble
    $ sudo apt install ros-humble-rt-usb-9axisimu-driver
    # ROS 2 Jazzy (ToDo)
    $

    2.2 ソースからインストールする場合

    $ cd ~/ros2_ws/src
    # Clone package & checkout ROS 2 branch
    $ git clone -b $ROS_DISTRO https://github.com/rt-net/rt_usb_9axisimu_driver
    
    # Install dependencies
    $ rosdep install -r -y -i --from-paths .
    
    # Build & Install
    $ cd ~/ros2_ws
    $ colcon build --symlink-install
    $ source ~/ros2_ws/install/setup.bash

    2.3 クイックスタート

    # Terminal 1
    $ source ~/ros2_ws/install/setup.bash
    $ ros2 run rt_usb_9axisimu_driver rt_usb_9axisimu_driver

    # Terminal 2
    $ source ~/ros2_ws/install/setup.bash
    $ ros2 lifecycle set rt_usb_9axisimu_driver configure
    $ ros2 lifecycle set rt_usb_9axisimu_driver activate
    # Echo topics (Press Ctrl+C for exit)
    $ ros2 topic echo /imu/data_raw
    $ ros2 topic echo /imu/mag
    $ ros2 topic echo /imu/temperature

    3. ノード

    3.1 rt_usb_9axisimu_driver

    rt_usb_9axisimu_driverはUSB出力9軸IMUセンサモジュールの出力を受信し、角速度と並進加速度・磁束密度をパブリッシュします。

    3.1.1 パブリッシュされるトピック

    3.1.2 パラメータ

    • ~frame_id (string, default: imu_link)

      • IMUデータのヘッダーにセットされるフレーム名
    • ~port (string, default: /dev/ttyACM0)

      • モジュールが接続されているポート名
    • ~linear_acceleration_stddev (double, default: 0.023145)

      • 並進加速度の共分散行列の対角成分の平方根(m/s^2)
    • ~angular_velocity_stddev (double, default: 0.0010621)

      • 角速度の共分散行列の対角成分の平方根(rad/s)
    • ~magnetic_field_stddev (double, default: 0.00000080786)

      • 磁束密度の共分散行列の対角成分の平方根(T)

    4. ROS 2 特有の使い方

    4.1 Lifecycle

    Lifecycle
    機能を使うことで、ノード実行中にUSBの抜き差しや、
    トピックのパブリッシュを稼働/停止できます。

    各状態での動作内容は次のとおりです。

    4.1.1 Unconfigured state

    • USBポート(~port)にアクセスしません
    • トピックをパブリッシュしません

    4.1.2 Configuring transition

    • パラメータを反映します
    • USBポート(~port)をオープンし9軸IMUセンサと通信します
      • 9軸IMUセンサの認識に失敗したらUnconfigured stateに遷移します

    4.1.3 Inactive state

    • トピックをパブリッシュしません

    4.1.4 Activating transition

    • 9軸IMUセンサと定期通信を開始します
      • 9軸IMUセンサとの通信に失敗したらUnconfigured stateに遷移します
    • トピックのパブリッシュを開始します

    4.1.5 Active state

    • トピックをパブリッシュします
    • 9軸IMUセンサとの通信に失敗しても状態遷移しません

    4.1.6 Deactivating transition

    • 9軸IMUセンサとの定期通信を停止します
    • トピックのパブリッシュを停止します

    4.1.7 CleaningUp transition

    • USBポート(~port)をクローズし9軸IMUセンサと通信を終了します

    4.1.8 Example

    # Terminal 1
    $ source ~/ros2_ws/install/setup.bash
    $ ros2 run rt_usb_9axisimu_driver rt_usb_9axisimu_driver

    # Terminal 2
    $ source ~/ros2_ws/install/setup.bash
    
    # User can plug-in/out the IMU module at unconfigure state.
    
    $ ros2 lifecycle set rt_usb_9axisimu_driver configure
    $ ros2 lifecycle set rt_usb_9axisimu_driver activate
    # The node start publishing the topics.
    
    # Stop publishing
    $ ros2 lifecycle set rt_usb_9axisimu_driver deactivate
    $ ros2 lifecycle set rt_usb_9axisimu_driver cleanup
    
    # User can plug-in/out the IMU module at unconfigure state.
    # User can set parameters of the node.
    $ ros2 param set /rt_usb_9axisimu_driver frame_id "imu2-link"
    $ ros2 param set /rt_usb_9axisimu_driver port "/dev/ttyACM1"
    
    $ ros2 lifecycle set rt_usb_9axisimu_driver configure
    $ ros2 lifecycle set rt_usb_9axisimu_driver activate
    # The node start publishing the topics.

    4.2 Component

    rt_usb_9axisimu_driver::Driverは
    Component
    として実装されているため、共有ライブラリとして実行できます。

    4.2.1 Example

    # Terminal 1
    $ source ~/ros2_ws/install/setup.bash
    $ ros2 run rclcpp_components component_container

    # Terminal 2
    $ source ~/ros2_ws/install/setup.bash
    $ ros2 component load /ComponentManager rt_usb_9axisimu_driver rt_usb_9axisimu_driver::Driver
    
    $ ros2 lifecycle set rt_usb_9axisimu_driver configure
    $ ros2 lifecycle set rt_usb_9axisimu_driver activate
    # The node start publishing the topics.

    Visit original content creator repository
    https://github.com/rt-net/rt_usb_9axisimu_driver

  • CodeAlpha_simple_chatbot

    AI Chatbot with Flask

    A modern, responsive chatbot application built with Flask, featuring an iOS-style UI design and dynamic theme switching.

    Features

    • 🤖 Intelligent conversation handling with natural language processing
    • 🎨 Modern iOS-style user interface
    • 🌓 Dynamic dark/light theme switching
    • 🌈 Animated gradient backgrounds
    • 📱 Fully responsive design
    • ✨ Smooth animations and transitions
    • 💬 Real-time chat interactions

    Technical Stack

    • Backend: Python Flask
    • Frontend: HTML5, CSS3, JavaScript
    • Styling: Custom CSS with iOS-inspired design
    • Animations: CSS animations and transitions
    • Theme Management: JavaScript-based theme switching

    Areas of Expertise

    The chatbot is knowledgeable in various technical domains:

    • Data Science & Analytics
    • Machine Learning
    • Artificial Intelligence
    • Full Stack Development
    • Cybersecurity

    Installation

    1. Clone the repository:

    git clone https://github.com/Tony-Stone-Code/CodeAlpha_simple_chatbot.git
    cd simple-chatbot
    1. Install the required dependencies:
    pip install -r requirements.txt
    1. Run the application:
    python3 app.py
    1. Open your browser and navigate to:
    http://localhost:5001
    

    Features in Detail

    Intelligent Conversation

    • Natural language processing for understanding user queries
    • Context-aware responses
    • Expertise in multiple technical domains
    • Friendly and engaging conversation style

    Modern UI/UX

    • iOS-inspired design elements
    • Smooth message animations
    • Interactive button effects
    • Dynamic message bubbles
    • Responsive layout for all devices

    Theme System

    • Automatic system theme detection
    • Manual theme toggle
    • Smooth theme transitions
    • Animated gradient backgrounds
    • Backdrop blur effects

    Responsive Design

    • Mobile-first approach
    • Adapts to all screen sizes
    • Touch-friendly interface
    • Optimized for both desktop and mobile

    Project Structure

    Basic chatbot/
    ├── app.py              # Flask application and routing
    ├── static/
    │   ├── style.css      # CSS styles and animations
    │   └── script.js      # Frontend JavaScript
    ├── templates/
    │   └── index.html     # Main HTML template
    └── README.md          # Project documentation
    

    Contributing

    Contributions are welcome! Feel free to submit pull requests or open issues for any improvements or bug fixes.

    License

    This project is licensed under the MIT License – see the LICENSE file for details.

    Author

    Anthony Opoku-Achempong (Tony-Stone-Code) – Data Scientist & Full Stack Developer

    • Expertise in Data Science, ML, AI
    • Full Stack Development
    • Cybersecurity Focus

    Acknowledgments

    • Inspired by modern iOS design principles
    • Built with best practices in web development
    • Focused on user experience and accessibility

    Visit original content creator repository
    https://github.com/Tony-Stone-Code/CodeAlpha_simple_chatbot

  • litkey

    Litkey

    🔥 Litkey makes keyboard shortcuts simple and enjoyable.

    Install

    # Using npm
    npm install litkey
    
    # Using yarn
    yarn add litkey

    Usage

    import litkey from 'litkey';
    
    // Add a global keyboard shortcut
    litkey('mod+k', () => {
      // do something
    });
    
    // Add a keyboard shortcut to a specific element
    litkey('mod+k', () => {
      // do something
    }, myElement);

    Usage with React

    import { useShortcut } from 'litkey';
    
    let Component = () => {
      let [clicked, setClicked] = useState(false);
    
      useShortcut('mod+a', () => {
        setClicked(true);
      });
    
      // You can also specify hook dependencies which will 
      // get passed on to the underlying useEffect
      useShortcut('mod+k', () => {
        setClicked(true);
      }, [/* react hook dependency list */]);
    
      // Using the fourth parameter, you can specify a
      // specific DOM element, in which the keyboard 
      // shortcut will be fired
      useShortcut('mod+k', () => {
        setClicked(true);
      }, [], myElement);
    
      return (
        <p>{ clicked ? 'clicked' : 'not clicked' }</p>
      );
    };

    API

    litkey(shortcut, handler, [context])

    The litkey function is the default export of litkey.

    shortcut: string | string[]

    shortcut is a string or an array of strings, which specify the key combinations which will fire the callback.

    handler: (event: KeyboardEvent) => any

    The handler is a callback function which will be called if the keyboard shortcut is pressed.
    It receives the KeyboardEvent as its first parameter.

    context?: HTMLElement

    The context is optional and can be used to specify the HTMLElement, in which litkey will listen for keyboard shortcuts.

    useShortcut(shortcut, handler, [dependencies, [context]])

    shortcut: string | string[]

    shortcut is a string or an array of strings, which specify the key combinations which will fire the callback.

    handler: (event: KeyboardEvent) => any

    The handler is a callback function which will be called if the keyboard shortcut is pressed.
    It receives the KeyboardEvent as its first parameter.

    dependencies: any[]

    dependencies is an optional array, which will be passed on directly to useEffect to serve as React hook dependencies.

    context?: HTMLElement

    context is optional and can be used to specify the HTMLElement, in which litkey will listen for keyboard shortcuts.

    License

    MIT © Tobias Herber

    Visit original content creator repository
    https://github.com/herber-legacy-4-varld-1/litkey

  • Er-Pescator

    How to use the “Er Pescator” automatic fishing system | Destiny 2

    Requirements

    • Have python 3 installed on your machine (Python3.9 or newer is suggested). You can download it from here.

    Setup

    You will need to procure a few packages using the python package manager, so for the unitiated this is how to use it:

    Open up a terminal of your liking (since I assume you are on Windows, the CMD is fine, just type cmd in the seach bar), then the command to use pip is one of the following, most likely the first one will work for you:

    • pip install <package_name>
    • python -m pip install <package_name>
    • python3 -m pip install <package_name>

    Now, install via pip the following packages:

    • vgamepad (this library)
      This will require you to install, also, some drivers, that the library will use to simulate a game-pad, follow the instructions on the wizard that pops on screen as you install the package to do so.
      pip install vgamepad
    • keyboard (this library)
      pip install keyboard

    Finally, download the code for “Er Pescator” from this github page, click this link and press the download icon on the top right side of the text area!
    Alternatively, if you have git ready to use, you can directly clone this repository.
    Anyway, you will be downloading the python script called er_pescator.py that performs the fishing 🙂 .

    Note that, before using the script, you need to restart Destiny 2 (if it was running since before the package installation process), as it needs to recognize the drivers for the simulated controller, and it does so on startup.

    One last thing, make sure to have the controller rumble enabled in Destiny 2.

    Usage

    We shall now fish!

    • Open the er_pescator.py script with right-click and “open with IDLE” or “edit with IDLE” (choose the newest version of python if prompted to do so). This shall open a new window with the script’s code, ignore it for now.
    • In Destiny 2, reach a pond and get close to it until you see the prompt to start fishing.
    • On the IDLE window we previously opened up, press “F5” to run the script.
    • Now move to Destiny 2 and press 9.
    • Finally, you can even do other stuff with your computer now, Destiny 2 does not need to be in the foreground!

    Once the script is running, its commands are the following:

    • 9: start the fishing routine
    • 0: stop the fishing routine

    Important

    The script uses the rumble commands sent to the controller as cue to decide when to pick up the fish, as the rumble is slightly random, it might happen that it missfires and starts going idle, in that case just restart the fishing routine by pressing 9.
    If you are curious and want to tune the behavior of the script, you can enable the logging of rumble values by changing line 6 into:
    log_rumble_values = True
    And then you can play around with the lower bounds of the two values on line 18. The values range from 0 to 255, so leave the upper bounds untouched. I found the (200, 220) pair of lower bounds to be pretty reliable, bue feel free to try others!

    Visit original content creator repository
    https://github.com/EMJzero/Er-Pescator

  • node-red-scriptable

    node-red-scriptable

    2021 by Ranki s.rankers@einfach-beraten.de

    Permission to use, copy, modify, and/or distribute this software for any purpose with or without fee is hereby granted.

    THE SOFTWARE IS PROVIDED “AS IS” AND THE AUTHOR DISCLAIMS ALL WARRANTIES WITH REGARD TO THIS SOFTWARE INCLUDING ALL IMPLIED WARRANTIES OF MERCHANTABILITY AND FITNESS. IN NO EVENT SHALL THE AUTHOR BE LIABLE FOR ANY SPECIAL, DIRECT, INDIRECT, OR CONSEQUENTIAL DAMAGES OR ANY DAMAGES WHATSOEVER RESULTING FROM LOSS OF USE, DATA OR PROFITS, WHETHER IN AN ACTION OF CONTRACT, NEGLIGENCE OR OTHER TORTIOUS ACTION, ARISING OUT OF OR IN CONNECTION WITH THE USE OR PERFORMANCE OF THIS SOFTWARE.

    DESCRIPTION

    This scriptable shows data from node-red resp. an external JSON-string. See further details (example of JSON-file and node-red integration) at the end of the coding!

    The scriptable can be used in small or medium mode (see examples). The alignment will be automatically done by the script.

    FEATURES

    The script can process several types of data like text, numbers (will be rounded), switches (with different possibilities like SFSymbols) and circles (e.g. to show a level indicator).

    EXAMPLES

    Medium size widget, «Hello world» example, v1.05
    Medium size Widget, user example: Ranki, v1.03 Small size Widget, user example: Ranki, v1.02
     
    Medium size Widget, user example: Jochen, v1.04  

    INSTALLATION

    1. Implement the node-red-integration.json part into your node-red installation and adapt the created functions to fill the requested JSON. The current implementation expects the file to be written directly to the node-red instance file system. Alternatively you can also create the file and upload it via FTP to a server of your choice.
    2. Implement the node-red.js into your scriptable app and adapt the variables in the beginning (host, subfolder, filename, opt. authentication etc.)

    Enjoy!

    RELEASE NOTES

    Version 1.06 (23.06.2025)

    • Introduced an update value for the last update of data (filled by source system)
    • Possibility to transfer more Parameters divided by &parametername=parametervalue in Widget-Settings The following parameters can be send/overwritten:
      • host
      • subfolder
      • filename
      • auth_necessary
      • username
      • password
      • bolUseDarkMode
      • forceDarkMode (new with v1.06)
    • Introduce widget-Parameter “forceDarkMode” to force Darkmode for widget independent from Device status

    Version 1.05 (13.05.2021)

    • typos corrected
    • introduced general possibility to transfer color information in data.color
    • changed structure in SFSymbol from data.SFSymbol_Color to data.color (but downside compatible)
    • enabled possibility to determ color of circle filling
    • switch to use dark mode added
    • code resturctured a little bit in order to have all settings at the top
    • optimized node-red example

    Version 1.04 (2021-05-04)

    Version 1.03 (2021-01-10)

    • minimal bugfixing
    • implementation of dataype ‘circle’
    • change default for basic auhentication to ‘false’

    Version 1.02 (2021-01-09)

    • minimal bugfixing
    • manual dark mode does influence widget background color, but does not provide variable dark
    • enhaced error handling: – missing widget in JSON
      • specify function in catch-error and write2error
      • add critical error indicator in order to write errors w/o error msg to the user

    Version 1.01 (2021-01-08)

    • enhanced color support of dark mode
    • seperated header and footer creation
    • separate logging and errors into separate functions
    • enhanced error handling

    Version 1.0 (2021-01-06)

    • initial creation

    BACKLOG/ IDEAS

    • enable differentiated text colors
    • definition of text colors for different ranges of the data value (example: 0-25: green, 26-50: yellow; 51-75: orange, 76 – 100: red)

    EXPECTED JSON-file (Example)

    see file: scriptable.ioswidget

    NODE-RED INTEGRATION (Example)

    see file: node-red-integration.json

    Visit original content creator repository https://github.com/rankerson/node-red-scriptable
  • gmgn-TrendingAnalyzer

    🚀 GMGN Trending Token Analyzer


    Screenshot 2025-02-03 at 19 11 42

    A sophisticated tool for analyzing trending cryptocurrency tokens across multiple timeframes using the GMGN.ai wrapper. The analyzer aggregates data, filters tokens based on key metrics, and provides visual analytics along with expert analysis.

    Screenshot 2025-02-03 at 19 19 18

    🔥 Features

    • 📊 Multi-timeframe token trend analysis (1m, 5m, 1h, 6h, 24h)
    • 📈 Data aggregation and filtering based on volume, market cap, and consistency
    • 🎨 Automated visualization generation
    • Continuous monitoring with automated refresh

    📌 Technical Analysis Components

    🏷️ Token Analysis Logic

    • Fetches trending tokens across multiple timeframes
    • Collects key metrics:
      • 🆔 Token ID, 🔗 Chain, 🏠 Address
      • 🔤 Symbol, 💰 Price, 📊 Volume
      • 🌎 Market Cap, 📉 Price Change Percentage
    • 🚨 Error handling for API requests
    • 🔍 Validation of token data integrity

    📊 Aggregation Logic

    • Groups tokens by address
    • Calculates key aggregated metrics:
      • 📈 Average price and volume
      • 📏 Median market cap
      • 🔀 Price change trends
      • 🔁 Consistency count (appearance across timeframes)
    • Filtering criteria:
      • ✅ Minimum volume threshold: 1000
      • ✅ Minimum market cap threshold: 10000
      • ✅ Minimum consistency count: 3 timeframes

    📉 Visualization Logic

    • Generates scatter plot visualization:
      • 📍 X-axis: Median Market Cap (log scale)
      • 📍 Y-axis: Average Volume (log scale)
      • 🎈 Bubble size: Consistency count
      • 🎨 Color gradient: Average price change
    • 🔤 Includes token symbol annotations
    • 🖼️ Saves high-resolution plot (300 DPI)

    🛠 Installation

    1️⃣ Clone the repository:

    git clone https://github.com/yllvar/gmgn-TrendingAnalyzer.git
    cd gmgn-TrendingAnalyzer

    2️⃣ Create and activate a virtual environment (optional but recommended):

    python -m venv venv
    source venv/bin/activate  # On Windows: venv\Scripts\activate

    3️⃣ Install dependencies:

    pip install -r requirements.txt

    🚀 Usage

    Run the analyzer:

    python analyzer.py

    The script will:

    • 📡 Fetch trending tokens every 60 seconds
    • 🧠 Generate analysis and visualizations
    • 🖼️ Save plots as ‘trending_analysis_plot.png’
    • 📑 Save analysis as ‘trending_analysis.csv’
    • 🖥️ Display token data and analysis in the console

    To stop the script, press Ctrl+C.

    📤 Output

    The analyzer produces:

    • 📑 Tabulated token data with key metrics
    • 🔗 List of token addresses for easy reference
    • 📊 Visual plot saved as 'trending_analysis_plot.png'

    📦 Dependencies

    • 🐍 pandas – Data manipulation and analysis
    • 📊 matplotlib – Data visualization
    • 📜 tabulate – Console table formatting
    • 🔑 python-dotenv – Environment variable management

    ⚠️ Notes

    💡 Acknowledgments

    This project is based on the work of 1f1n and his repository: gmgnai-wrapper.

    Big shoutout to 1f1n for his amazing work! 🙌

    🤝 Contributing

    Feel free to fork this repository, make improvements, and submit a pull request. Contributions are always welcome!

    📜 License

    This project is open-source and free to use. Modify it as you see fit!


    Visit original content creator repository https://github.com/yllvar/gmgn-TrendingAnalyzer
  • build-julia

    build-julia

    An action to build Julia from source for a given commit.

    Usage

    See action.yml.

    name: Example
    
    on: [push, pull_request, workflow_dispatch]
    
    jobs:
      example:
        runs-on: ubuntu-20.04
        strategy:
          matrix:
            # Even if you are only running one build, you may want to use a strategy matrix,
            # as it allows you to refer to the ref using ${{ matrix.julia-ref }} in your workflow.
            # This makes it easier to edit the version that you want to build without having to update
            # several steps.
            julia-ref: [v1.5.3]
    
        steps:
          - name: Cache
            id: cache-julia
            uses: actions/cache@v2
            with:
              # If you use a different target dir, you may want to update the cache key to include that info.
              # actions/cache does not provide an option to specify the target dir for restoring the cache,
              # so you may run into issues where the target dir of the build-julia action mismatches the cached directory.
              path: ~/julia
    
              # Note that this cache key will not work with branches
              # because there could be new commits after the cache has been created.
              key: ${{ runner.os }}-${{ matrix.julia-ref }}
    
          - name: Build Julia
            # Only rebuild Julia if there is no cache hit.
            if: steps.cache-julia.outputs.cache-hit != 'true'
            uses: julia-actions/build-julia@v1
            with:
              # The value that is passed to git checkout, e.g. a tag, branch or a commit.
              #
              # Default: master
              ref: ${{ matrix.julia-ref }}
    
              # The value that is passed to git clone. If you want to build Julia from a fork of yours,
              # you can change this value to https://github.com/YOUR_GITHUB_NAME/julia.git.
              #
              # Default: https://github.com/JuliaLang/julia.git
              source-repo: ''
    
              # The directory that Julia will be installed in. Changing this may be useful when building several
              # versions of Julia within the same environment.
              #
              # Default: $HOME/julia
              target-dir: ''

    Visit original content creator repository
    https://github.com/julia-actions/build-julia

  • vscode-workspaces

    VSCode Workspaces Extension

    GitHub License

    GNOME Extensions download

    Description

    VSCode Workspaces is a project that provides a GNOME Shell extension for accessing visual studio code/codium recently opened workspaces/directories.

    With workspace support, you can open a workspace in Visual Studio Code with a single click.

    Features

    • Supports GNOME Shell 45+
    • List all your local VSCode workspaces
    • List all your remote VSCode projects
    • Add a custom workspace by path
    • Supports both Visual Studio Code and Codium
    • Optional Nautilus extensions for opening folders and files in Visual Studio Code

    Install Extension

    Install from GNOME Extensions

    Install from Source

    bash <(wget -qO- https://raw.githubusercontent.com/ZanzyTHEbar/vscode-workspaces/main/install.sh)

    Usage

    GNOME Shell Extension

    To open a recent folder or workspace, click on the Visual Studio Code icon in the top bar and select a recent folder or workspace.

    You also have various options to configure the extension in the GNOME Tweaks application.

    Integrates well with the VSCode Search Provider.

    Uninstall GNOME Shell Extension

    To uninstall a GNOME Shell extension, you can use the GNOME Tweaks application or the gnome-extensions command.

    gnome-extensions disable vscode-workspaces@prometheontechnologies.com
    gnome-extensions uninstall vscode-workspaces@prometheontechnologies.com

    You can also remove the directory manually.

    rm -rf ~/.local/share/gnome-shell/extensions/vscode-workspaces@prometheontechnologies.com

    Nautilus Extensions

    Provided are two other, optional, extensions for Nautilus.

    The first, vscode_nautilus_workspaces.py, adds a right-click context menu to select from a list of recently accessed workspaces or directories and open in Visual Studio Code.

    The second, vscode_nautilus_open.py, adds a right-click context menu to open a folder or file in Visual Studio Code.

    To open a folder or file in Visual Studio Code, right-click on an item in Nautilus and select the “Open in Code” option.

    To open a recent folder or workspace, right-click on an empty space in Nautilus and select the “Open Recent Workspaces” option.

    Uninstall Nautilus Extensions

    rm -f ~/.local/share/nautilus-python/extensions/vscode_nautilus_workspaces.py
    rm -f ~/.local/share/nautilus-python/extensions/vscode_nautilus_open.py

    Development

    The latest development version requires git, node, and make.

    I use pnpm, but you can use npm or yarn if you prefer. It is up to you to modify the scripts to use your preferred package manager.

    Navigate to your desired directory and execute following commands in the terminal:

    GNOME 45+

    git clone https://github.com/ZanzyTHEbar/vscode-workspaces.git
    cd vscode-workspaces/gnome-extension
    
    make && make install

    You can run make help to see all available commands.

    Enabling the extension

    After installation you need to enable the extension.

    • First restart GNOME Shell (ALt + F2, r, Enter, or Log-Out/Log-In if you use Wayland)
    • Now you should see the VSCode W extension in the Extensions application (reopen the app if needed to load new data), where you can enable it.

    Debugging

    The GNOME Extension has a debug mode that is enabled by default. You can disable it by opening the settings of the extension in the GNOME Extensions application.

    I personally use Extensions List, a GNOME Shell extension.

    If you would like to see logs for this extension: journalctl /usr/bin/gnome-shell -f | grep vscode-workspaces.

    Or simply run journalctl /usr/bin/gnome-shell -f and look for the logs.

    Contributing

    If you’d like to contribute, please fork the repository and use a feature branch. Pull requests are warmly welcome 😄

    Visit original content creator repository https://github.com/ZanzyTHEbar/vscode-workspaces
  • Noti (Telegram Bot)

    Noti (Telegram Bot)

    Noti (Telegram Bot) repository has Ukrainian 🇺🇦 and English 🇬🇧 localizations

    Quick Navigation

    Noti 🇺🇦

    Обкладинка бота

    Про проект

    Noti – це зручний і функціональний Telegram бот, створений для полегшення вашого повсякденного життя. З його допомогою ви зможете легко планувати різні завдання, події та нагадування, щоб нічого не пропустити та завжди залишатися організованим. Його основна задача нагадувати вам про повсякденні дії, які потрібно робити з певною періодичністю.

    Використання

    Noti має зручний та інтуїтивно зрозумілий інтерфейс. Ось основні команди для роботи з ботом:

    • /start – запустити бота та отримати вітальне повідомлення
    • /help – отримати інформацію про функції бота
    • /info – дізнатися кількість днів до найближчого нагадування
    • /add_notification – додати нове нагадування
    • /edit_notification – редагувати нагадування, що вже існує
    • /remove_notification – видалити нагадування
    • /remove_user – видалити всю особисту інформацію

    Використані технології

    Noti розроблено з використанням наступних технологій:

    • Мова програмування: Python 3.11.8
    • Бібліотека для роботи з Telegram API: telebot 0.0.5
    • Стандартні бібліотеки Python: json, datetime, calendar, time
    • Сторонні бібліотеки: schedule 1.2.1

    Посилання

    Username бота: @notification_noti_bot

    Посилання на бота: https://t.me/notification_noti_bot


    Noti 🇬🇧

    The bot's cover

    About

    Noti is a convenient and functional Telegram bot designed to make your daily life easier. With its help, you can easily schedule various tasks, events, and reminders so that you don’t miss anything and always stay organized. Its main task is to remind you of everyday activities that need to be done at a certain frequency.

    Usage

    Noti has a user-friendly and intuitive interface. Here are the main commands for working with the bot:

    • /start – start the bot and get a welcome message
    • /help– get information about the bot’s functions
    • /info – find out the number of days until the next reminder
    • /add_notification – add a new reminder
    • /edit_notification – edit an existing reminder
    • /remove_notification – delete a reminder
    • /remove_user – delete all personal information

    Technologies Used

    Noti is developed using the following technologies:

    • Programming language: Python 3.11.8
    • Library for working with Telegram API: telebot 0.0.5
    • Standard Python libraries: json, datetime, calendar, time
    • Standard libraries: schedule 1.2.1

    Links

    Bot username: @notification_noti_bot

    Bot link: https://t.me/notification_noti_bot

    Visit original content creator repository https://github.com/NikitaBerezhnyj/Noti